Once again you will need to be in Adobe Photoshop, any version will be fine.

Next you will need to open the image you have chosen to work with and make sure it fits on the screen. If it opens too large you will need to zoom out. Do this by clicking on the symbol in your toolbox that looks like a magnifying glass. Once you do that you will see three buttons at the top of your screen. One will say "Actual Pixels", another will say "Fit on Screen", and the third will say "Print Size." Click "Fit on Screen." This makes it a reasonable size to work with.
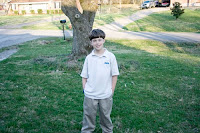
Now, look at your image. Decide what is the most important part of this picture and what is just "junk." The "junk" in your image is all the extra stuff you were not trying to get a picture of..... like your neighbor's kid sticking his tongue out in the background or the guy driving by in his car while shoving a doughnut into his mouth (Ok, whatever else is in your picture you get the idea!!) In this one you can see my mailbox and my neighbor's car in the driveway. I don't need all of that in my picture, I just want Cameron.
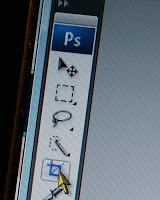
On the left side of screen you should still see your toolbox. Look for the
 crop
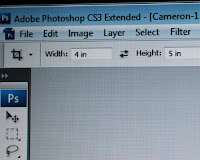
crop  nter the size you want your final image to be. If you want a 4x6 then these are the numbers you will put in these boxes. Make sure you pay attention to which box is for height and which box is for width.
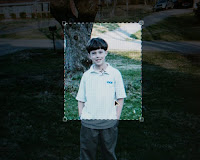
Ok, now figure out where you want the top left part of your image to be and put your mouse there. Click and hold and then drag your "box" down and to the right until you have a box in the size you want. Once you draw your box and let go, the center of your box will still be lit and the rest of your image will be darkened.
 This is to show you what it will look like. If you want to you can still move the box around. Simply place your mouse inside the box somewhere (you will see an arrow), hold down and move. You will be able to drag your box anywhere over your image until you get exactly the picture you want. When you are happy with it you can press "Enter" or click the check mark at the top of your screen.
You can do this as many times as you like until you get it as close as you want. Keep in mind, though, that the closer you crop your image, the less you will be able to enlarge it. You don't want to crop out all but an inch of space if you want it to enlarge to 16x20! You lose pixels every time you crop, so just be careful.
 The last thing you want is to create a blurry image.
That's it! You will now see your finished product! Just look at the difference it makes to have all the "junk" out of the way! This comes in handy when you take those family beach pictures, vacation pictures, and much more!
Many thanks to my sweet Cameron for leaving his homework long enough to pose for a quick picture for me!
Any problems or questions? Just leave a comment and I will respond!
Happy cropping!


Just wanted to let you know you are my 3rd stop on my 6 degrees of blogging tour. I'm also a new follower! Thanks for the cropping tips!
ReplyDeleteThat is awesome! Thanks!
ReplyDeleteMore tips to come in 2 weeks!